
Hey guys! I’m writing up this article as an accompanying piece to my EVE Uni lecture on the topic. The idea is that I want to teach the general process of making a PvE fit. By the end of this article, you should be able to take any PvE situation and, using Pyfa, design a ship for it. I would also seriously suggest reading my guide: How 2 Fit. It goes over some really valuable tips and advice. If you find the jargon here a bit confusing then check out EVE Uni’s Lexicon.
All that said, I want to try and make this guide as beginner-friendly as possible without boring the hell out of people who have been playing a while. If you have any specific questions then drop them in the comments below. If they’re fundamental enough then I’ll add in a section to the article.
I’m also going to assume that you know at least the basics of what slots are, to not use meta 0 (basic T1) modules and other simple things. If you need an even more basic refresher then EVE Uni has that too.
Pyfa
It would be silly of me not to mention Pyfa and how to read it in a guide all about using it. You can download the Python Fitting Assistant at its Github page and read through the guide below to get an idea of how to use the basic user interface. There are also a few guides available in the Pyfa wiki, though it’s easiest just to experiment and see what different things do. You aren’t going to break anything!
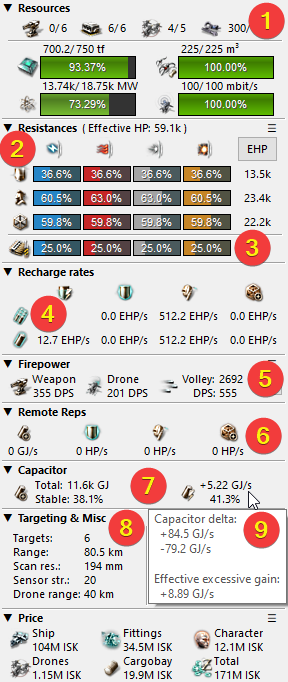
- Fitting / drones & cargo / hardpoints. These are simple to understand, as long as the fit isn’t above 100% in any area then things will fit. You can also use the PG/CPU % to easily determine if you’d rather use an implant of 1,2, or 3%
- Resists. From top to bottom you have shield, armour, and hull resists. Against Sleepers (wormhole enemies) you need these to be balanced if possible. The “EHP” button toggles to zero resists or “raw” HP.
- Incoming Damage. For the purposes of tank calculation, you can change incoming damage to other profiles such as the Thermal + Kinetic Serpentis. Leave it as omni for my guides.
- Tank. This shows you how much you can repair per second with resists and damage profile considered. The top number is the maximum and the bottom is the best you can get under current simulated capacitor. If stable, these numbers are the same. From left to right: Passive shield regen, active shield reps, active armour reps, hull reps. “Projected” remote reps onto you will appear here, too.
- Outgoing DPS. The amount of damage you deal. Right click to factor in reload time.
- Outgoing Reps. Most useful for logi fit comparison, not so much for solo/duo fits.
- Capacitor Stats. Shows raw capacitor and how much you have when stable. The right hand side shows capacitor resistance and how much you are stable by in gigajoules per second.
- Targeting and drones. Normally this isn’t something to consider so much unless you have a long-ranged fit or a drone boat. Note the drone control range and the range at which enemies will orbit you.
- Capacitor Tooltip. This will show you the effective excessive cap regen that you have. This is the best number to compare to incoming NPC neuts per second.
Why learn to fit?
So why would you bother learning to fit a ship yourself if sites like mine exist? Well first and foremost, I haven’t (yet!) written an article on every ship. You might also find that, in time, my articles become out of date. I endeavour to update them, but at some point, it’s just too much work for too little gain. It’s better that I produce a guide such as this and let you make your own decisions on how to modify a fit for modern uses.
There’s also the thought that you may want to use a particular ship for a particular job. Maybe you have limited skills, maybe you really want to play with Heavy Assault Cruisers (HACs) for some reason. In my case I often just want to challenge myself and it leads to making silly fits. Designing something that works for half the price or a fit which is actually fun to fly can be a super rewarding experience. A great example of this was coming up with the cap boosted C2 running Cylone in my alpha clone article. Under 100m ISK I’m sure it’s the best thing you could possibly use for C2 wormhole anomalies and it’s hella fun to fly since it just barely tanks.
There’s also the part of fitting which is all about learning the why behind fittings. Understanding the reason for a fit being the way it is helps you be a better pilot and helps you make better decisions while out flying in EVE. Even just the little things like knowing how cap intensive your warp disruptor is can save minutes of cap life and get you out of some situations.

What kind of PvE are you doing?
So moving on to the actual guide portion of this guide, we first have to consider what you’re fighting. The slide below goes over some of the main questions that you want to ask yourself as well as a list of some of the more popular hulls used in PvE content. The primary questions, though, are “which site/dungeon are you fighting in?” and “what type of enemies are you fighting?”
- Mission/Deadspace/Anomaly NPCs: This refers to pretty much any of the normal enemies you find in highsec, lowsec, and nullsec. They will usually only do two types of damage and will barely neut you at all. The primary thing to check is what damage types they are doing. For example, Serpentis only do Kinetic and Thermal damage at a 61.7/38.3% split. T2/3 Caldari ships such as the Tengu are naturally T2 resisted towards those, meaning that you can afford to use more modules on outgoing damage and application!
- Sleepers/Wormhole Sites: These are much much more difficult than kspace rats. Sleepers do omni (all types) damage and will usually neut very heavily. This makes it more difficult to design fits to fight them as you need to typically push a ship to its limits.
- Triglavians/EDENCOM: These are strange since they actually ramp up similar to how player Entropic Disintegrators work. In addition, the Trigs will then shoot high volley EM/Kin missiles to complement the constant Therm/Expl damage. EDENCOM empire NPCs will fire with their own race’s natural damage. Think EM/Therm for Amarr because… lasers!
Further to just the damage type there are more considerations that you could research about the site before you do it. Do the enemies typically tracking disrupt? Do they kite you out? You might also want to consider some quality of life features for yourself. Do you need a fast warping ship like a Cynabal or Machariel for mission running? Do you want a Covert Ops Cloak to warp away in safety if deep in hostile space?
To get started, think of any site and just try to answer each of the questions below in my slide. It will give you an idea of what to expect. If you can’t find the answer to something about a site on Google then the easiest thing is to find something else that works and examine it. If we imagine that you don’t know the DPS of a site, but you KNOW that a particular Dominix fit can do it because you saw a video. Well, plug that Domi into Pyfa and see how much it tanks. What is the capacitor like? Is there anything weird about it? If you can use those DPS numbers on your new fit then you’re good.
A small note for reference, the ships pictured below as good PvE options are great because they either have good missiles, drones, or resist/tank bonuses. Missiles are excellent as you don’t need to care much about application and drones will chase enemies forever without costing ammo! Those example ships listed are:
- Rattlesnake – Big tank, good drones and missiles
- Gila – It’s a baby Rattle!
- Tengu – Great missile damage and local tank
- Ishtar – Great drone damage
- Myrmidon – Like an Ishtar but cheaper
- Praxis – Does anything, including great missiles and drones
- Nestor – Can work in a pair to remote rep each other

How do you plan on tanking?
It would be silly to assume that you can go into a PvE site without any kind of tank. You’d die in seconds. A good PvE fit has some sort of damage mitigation or repairs. That’s the key, really. If you can repair your own shield or armour more than the damage you take then you will eventually complete the site. It’s as simple as that. How you go about this is the next question, then. I’ve compiled the main ways to do it below:
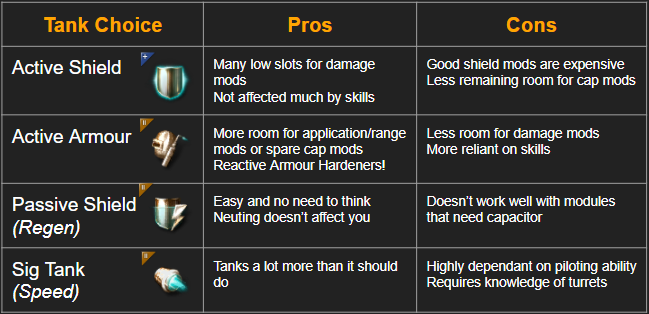
Each of the tank types is simple enough to understand. You’re either repair your own shield, repairing your own armour, leveraging natural shield regen, or being so small and fast that you barely take any damage. There is also the consideration of sniping and simply staying out of NPC range, but even I hate that. It keeps you away from loot and is annoying to set up.
Module Choice
Looking at these types of tank, then, I feel it would be best to list the types of modules which affect each tank style in order of usefulness. Do keep in mind stacking penalties, though.
- Active Shield: Shield Booster (1x only usually!), Shield Boost Amps, Shield resist mods and rigs, Damage Control, Core Defense Operational Solidifier. Make sure to use plenty of cap mods/rigs, but do not use a Capacitor Power Relay as it reduces shield boosting.
- Active Armour: Armour Rep (1-2x), Armour resist mods and rigs, Auxiliary Nano Pumps and Nanobot Accelerators, Reactive Armour Hardener, Damage Control.
- Passive Shield: Core Defense Field Purger, Shield Power Relay, Shield Extenders, Shield Rechargers, Shield resist mods and rigs, Power diagnostics. Do not use Damage Controls. Another Shield Power Relay is usually better.
- Sig Tanking: A good afterburner and maybe a nanofibre! Combine this with a light tank of any other kind and fly well. It’s very hard to judge how much damage you will mitigate and you must test this in the site itself or through experience.
I appreciate that this doesn’t exactly tell you how to fit each style of fit. In truth I can’t really do that without sitting down and explaining things through fits one on one. It should give you an idea, though, of what each style of tanking is about and which modules influence it. I suggest taking a fit and playing with these modules. Read their descriptions and try toggling them on and off on a fit. Watch what each ones does. Does a Shield Boost Amp or a Multispectrum work better on your Rattle? Try each and see!

Fitting Process (with example)
Now the best way for me to explain how to actually design a fit is to use an example and step through it in what I feel is a foolproof process. I sat down and thought through how my mind actually works when I’m working on a PvE fit and this is pretty much it. There are four main steps and if you follow them without skimping on things then it is mathematically impossible for you to die in a site.
To outline it, the four steps are:
- Pick your ship and weapon system and any important modules such as MJD.
- Fit enough tank to survive. Use as many slots as needed.
- Fix your capacitor so that it’s stable enough under projected neuting.
- Use the remaining slots for damage and application.
If at any point during this process you go over on powergrid or CPU then address that there and then. You might also think about how to revise the fit to accommodate fitting mods gracefully. Power Diagnostics as an example will boost your powergrid (great!) while also giving you more cap regen. This can save wasting a rig slot on an Ancillary Current Router that might otherwise give you more damage or a space for a Capacitor Control Circuit.
Step 1 – Ship and Weapon Choice

You’re going to want to start here by opening and taking a look at my EVE Uni slide to the right. The green boxes show what I’m particularly paying attention to during each step. What we’re designing here is a Cruise Missile Praxis that can kill the third wave of an Oruze Construct. It’s not as refined of a fit as in my How 2 Krab series, but it’s acceptable.
For starters, I did my research and used this guide to find the incoming DPS and neuts for that wave. It’s the most difficult wave in the site so if you can complete that then you can complete the entire site easily. You won’t always find nice numbers like this, but as before you can always examine a currently working fit and see what it tanks.
Example: Oruze Construct
Highest DPS: 592 & -10 GJ/s (Wave 3)
Highest Neuts: -24 GJ/s (Wave 1)
Webs/Paints: 4x Webs (Wave 1)
We should aim for:
~600 EHP/s Omni Tank~15 GJ/s “Spare” Capacitor
There isn’t much else to do at this stage with the fit, but what I’m looking at is the range and application of my missiles, how much damage my drones already do, and how much PG/CPU I have left. I’ve also fitted a Drone Link Augmentor since I know that this is a long-range fit and I want to be able to send my drones really far away.
My lock range is a little short at 87km (compared to missile range) so this is also the stage where I would equip a Sensor Booster, Signal Amplifier, or Ionic Field Projector if I really cared about range above all else! Remember, this is where you are equipping what you absolutely need. The rest of the fit is going to work around that. If you need hacking modules, webs, or prop mods then add them now.
Step 2 – Fit the Tank
This is actually much easier than you might think. Remember that choice of tank that I hope you already picked? Start putting modules on now and watch what happens. It’s quite easy since you really just need to keep using slots until you have enough EHP/s to survive against the rats.

My example here uses a very basic setup of two reps, resist mods, and a rig that increases the amount repaired by armour reps. I’m tanking 571 EHP/s which is nearly enough and will be fine with a cycle or two of heat (or boosters/implants). I’ve also noted that I have plenty of powergrid of the cap batteries that I intend on using. I’ve also kept it very cheap and avoided the use of blingy faction modules. Only use those if you actually need them, there’s no point in excessive cost. This becomes particularly important when choosing a shield booster since faction ones tend to get very good, but very expensive quite quickly.
If I wanted to at this stage I could also experiment with the use of just one rep instead of two. This would make the fit more cap stable, but would potentially use up more slots just so that single rep does enough to stop me dying. You don’t know until you experiment with these things and it’s all a part of the learning process. Don’t be afraid to go for trial and error with modules until you get something good. Just look it afterwards and think about what each module is doing. Why is it good?
Step 3 – Fix Your Capacitor

This can be done at the same time as you fit the tank, but doing it now is the “foolproof” way. Things to pay attention to while you do it are you capacitor stability, delta, and effective excess cap regen in Pyfa. The delta is total cap going out vs cap coming in from modules (or remotely projected ships). This can be useful in directly comparing the exact amount gained by each module and it’s the number I most often look at.
I can’t explain exactly when you need to use various numbers of batteries, cap rechargers, flux coils, power relays, or cap control circuits unfortunately. Batteries and cap control circuit rigs tend to be some of the most effective per slot, but it’s always good to just play around with it and get a feel for what works. Don’t use a cap booster unless you intend on burning through charges in order to complete sites (and what happens when you run out mid site!).
Effective cap regen is also important as I’ve said. If you expect to face neuts then this number must exceed the incoming neut pressure or you will be neuted out eventually. This is calculated using your neut resistance (from batteries) and the excess delta above “cap stable”. While you do all of this, you can refer to the second row of EHP/s numbers in Pyfa. This refers to your “stable tank”. It is the amount you can tank and still remain stable in an unstable capacitor fit. To do that you would simply use your reps a little bit less and not perma-run them.
This is also a time where you could start looking at projecting potential neuting on using Pyfa. You’ll see an example of that in the next slide but it’s quite a simple thing to do. You can take any neut module in Pyfa and right click to project onto current fit (or drag into the projection box at the bottom). They are additive and you can add various neuts together to approximate NPC neuting values if you have them. The neut values are as follows:
- Small T1 Neut: -7.5GJ/s
- Small Meta Neut: -8.33GJ/s
- Small T2 Neut: -9.17GJ/s
- Medium T1 Neut: -12.5GJ/s
- Medium Meta Neut: -13.8GJ/s
- Medium T2 Neut: -15GJ/s
- Heavy T1 Neut: -20.8GJ/s
- Heavy Meta Neut: -22.9GJ/s
- Heavy T2 Neut: -25GJ/s
Step 4 – Fill Out the Rest
The easiest and most self-explanatory stage. At this point, you should be good to go and the fit will work. Hopefully, you still have some slots left for damage and application, though! You can fill them now with Ballistic Controls, Drone Damage Amps, Target Painters, Guidance or Tracking Computers. Anything to make the site go faster.

My slide on the left shows this being done with some missile guidance computers and a ballistic control. I can then examine my final fit to see the damage and application numbers. If I’m not happy right now then I could always go back to step one and begin again. I could also start modifying and playing around with any of the slots to try and achieve a more desirable outcome such as more outgoing damage!
You might also notice that in this slide I have needed to use an overclock rig to fix the CPU in the simplest way possible. If you wanted to rework this then a good place to start might be there. That rig slot can be used for missile damage instead so you can start thinking about how you might take it off by reducing the CPU usage on the fit. This is straying into the world of fit optimisation, but it’s easy to try simple swaps such as energized to non-energized resists or removal of the Drone Link Augmentor.
I do hope that this process makes sense to other people. It’s really all trial and error until you get the hang of what does what. Read up about stacking penalties, read the descriptions of modules, and just try things out. I can’t emphasis that enough. If a fit works with one module, is it better with a different one? You don’t know until you try it. This is also how you learn other silly little things such as pithum shield boosters having better throughput and gistum shield boosters being more efficient. You can right click > variations to try them all out within a minute or so. As before, though, I’m always happy to answer questions in the comments below.
Bonus: Two-Pilot Setups
As a final little tip, I thought it best to include some talk of how you design a duo setup. Say, for example, two Nestors or two Domis. The process really is exactly the same, except you need to project the fit onto itself. That’s easy. First, you should make the base fit (without anything on it), then you need to go back to the fittings and drag that fit onto your “Projected” tab in Pyfa at the bottom.
Doing this will essentially send all of the modules equipped onto the itself. Think about it as if you have two of the same ship hitting each other with all of their EWAR, remote reps, remote cap etc. This will directly impact your repaired amount and capacitor. So a remote rep ship projecting onto itself will both use up the capacitor, but will also display how much it repairs in the standard EHP/s tank section. You just build these setups in the same way but with a focus on outgoing repairs and outgoing cap transfers while still making sure that your capacitor and tank are healthy.
In fact, these kinds of fits give you even more options than usual! If you need more cap and your tank is good then consider swapping a remote rep for an extra cap transfer. You can also start doing silly things like tinker fits with full remote cap transfers and a really beefy local tank (such as 2x shield boosters or 3x armour reps) that otherwise would not be possible to use due to the high cap use.
A great example of a working fit like this would be the Nestor. Take a look at the fit below and see how it behaves when you apply it to itself in Pyfa. Try toggling high slots on and off to see what they do 🙂
C5 Duo Nestor
[Nestor, Cheapy Nestor]

Drone Damage Amplifier II
Drone Damage Amplifier II
Multispectrum Energized Membrane II
Multispectrum Energized Membrane II
1600mm Steel Plates II
Damage Control II

Cap Recharger II
Cap Recharger II
Cap Recharger II
Cap Recharger II
Large Cap Battery II
Large Cap Battery II

Large I-ax Enduring Remote Armor Repairer
Large I-ax Enduring Remote Armor Repairer
Large I-ax Enduring Remote Armor Repairer
Medium I-ax Enduring Remote Armor Repairer
Medium I-ax Enduring Remote Armor Repairer
Large Remote Capacitor Transmitter II
Large Remote Capacitor Transmitter II

Large Remote Repair Augmentor I
Large Explosive Armor Reinforcer I
Large Drone Control Range Augmentor I


Garde II x5
Hammerhead II x5
Ogre II x5
Praetor II x5
Valkyrie II x5
Warrior II x5


Inherent Implants 'Squire' Capacitor Systems Operation EO-601
Inherent Implants 'Noble' Remote Armor Repair Systems RA-703
Inherent Implants 'Squire' Capacitor Management EM-801
Inherent Implants 'Noble' Hull Upgrades HG-1001


Nanite Repair Paste x150
Optimal Range Script x1
Tracking Speed Script x1
Drone Damage Amplifier II x2
Omnidirectional Tracking Link II x1
Explosive Energized Membrane II x1
Multispectrum Energized Membrane II x1
Large Micro Jump Drive x1
Stasis Webifier II x1
Warp Scrambler II x2
I love to design my own fits and try them and really enjoy these moments of thought when you try to figure our what you want to achieve and how things works.
Still I thought I already knew a bunch of things about fitting but I was wrong 🙂
It’s always interesting to get someone else’s approach of the problems especially when you realised you had things wrong or did not fully understand them.
Likewise I learned a few tricks about Pyfa : Duno why I never thought about adding modules in the projected tab. I was adding ships … Likewise I was not aware of the mouse over in the right handside of the capacitor section …
Another thumbs up !
Really really good blog so far !
[…] a few other articles that I’ve written and if you enjoy this then I recommend checking out Fitting Fundamentals: PvE Fits. Another article which takes a look a the PvP fit design process is How 2 Fit. PvP and PvE […]